Table of Contents
Installation
Run
windows_x64_64.exe(Windows 64bit): This file is available from https://www.gams.com/latest/. Please note that the installation may require administrative privileges on your machine.You have two options to run the installer: In default or advanced mode. In the default mode, the installer will prompt you for the name of the directory in which to install GAMS. We call this directory the
GAMS directory. You may accept the default choice or pick another directory. Please remember: if you want to install two different versions of GAMS, they must be in separate directories.If you choose to use the advanced mode, the installer will also ask you for a name of a start menu folder, if GAMS should be installed for all users, if the
GAMS directoryshould be added to thePATHenvironment variable and which desktop icons should be created.The "GAMS License" page allows you to select a GAMS license. The installer searches for existing licenses in various locations and automatically selects one based on the following order of precedence:
- Clipboard
- User Documents directory (
C:\Users\username\Documents\GAMS) - Previous GAMS installation found in the registry (User)
- Previous GAMS installation found in the registry (System)
Additionally, you can manually browse for a license file (gamslice.txt) or use the included demo license.The latter is also used if no other license is found.
If your GAMS license is provided as a 36-character access code (e.g., through the GAMS Academic Portal), select the "License from Access Code" option, enter the code into the "Access Code" text box and click "Get License". The license will be automatically retrieved from the license server. When installing a license for the current user (default), the license file is saved toC:\Users\username\Documents\GAMS. If installing for all users (or if the "Write License to System Directory" option is selected), the license will be saved to the GAMS system directory instead.For automating the installation of GAMS, it is possible to provide the command line parameters
/SP- /SILENT. This will install GAMS in a non-interactive manner using default settings. Note that depending on the security settings, the User Account Control asking for permission might still be active. The following command line parameters are available to further customize the non-interactive installation:/installAllUsers=yes|no(default:no): Can be used in order to install forAll Usersinstead ofCurrent User./noLicense=yes|no(default:no): Can be used in order to prevent any GAMS license from being written./noIconscan be used in order to check theDon't create a Start Menu foldercheckbox on theSelect Start Menu Folderpage./desktopIcons=yes|no(default:yes) can be used in order to turn on/off the creation of a Desktop icon forGAMS Studio./allUsers: Perform installation in administrative install mode./currentUser: Perform installation in non administrative install mode. If specified,/installAllUsers=yeshas no effect.
- Attention
- Under Windows 10 the Windows Installer package may not update system environment variables. To work around this issue, log off of Windows after the installation, and then log on again.
- Note
- The installer can be run unattended with the switches
/SILENTor/VERYSILENTand might require some post installation task (like copying the license file to an appropriate location). This unattended mode also skips execution of some code in the installer that can cause failures on exotically configured systems.
- During the installation of GAMS, the setup process helps in setting up the license to be used with GAMS. Note that the license specified during installation can be changed later. More on the license setup can be found here.
- Choose the default solvers: Run GAMS Studio by double clicking
studio.exefrom the GAMS system subdirectoryStudio. To view or edit the default solvers, open the GAMS Configuration Editor in Studio. You can also skip this and thus accept the existing defaults if you wish, but most users want to select new default solvers for each model type. - Run a few models to test the GAMS system: The Model Library Explorer allows you to pick some models from the GAMS model library easily. After selecting one, press
F9to run it, and view the solution. To test your installation, run the following models from the GAMS model library:LP: trnsport (objective value: 153.675) NLP: chenery (objective value: 1058.9) MIP: bid (optimal solution: 15210109.512) MINLP: procsel (optimal solution: 1.9231) MCP: scarfmcp (no objective function) MPSGE: scarfmge (no objective function)
Visual C++ Redistributable Dependency
- Some solvers in the system as well as GAMS Studio have dependencies on certain Visual C++ libraries. These are present on most Windows systems but are missing on some. If you get a complaint about missing libraries on startup of GAMS Studio or when solving a model, please run the installer
vcredist_x64.exefor these libraries, which can be found in the GAMS installation folder in directory[GAMS system]\studio.
Command Line Use of GAMS
Users wishing to use GAMS from the command line (aka the console mode) may want to perform the following steps. These steps are not necessary to run GAMS via Studio.
- We recommend to add the GAMS directory to your environment path in order to avoid having to type in an absolute path name each time you run GAMS. Run the installer in advanced mode and mark the check-box
Add GAMS directory to PATH environment variable. Run the program
gamsinst:gamsinstis a command line program used to configure GAMS. It prompts the user for default solvers to be used for each model type. If possible, choose solvers you have licensed, since unlicensed solvers will only run in demonstration mode. The solver defaults can be changed by:a. rerunning
gamsinstand resetting the default valuesb. setting a command line default, e.g.
gams trnsport lp=soplexc. by an option statement in the GAMS model, e.g:
option lp=soplex;The system wide solver defaults are shared by the command line and GAMS Studio, so you can also choose to set these defaults using GAMS Studio.
Warning from Microsoft SmartScreen Filter
The SmartScreen is a feature that is used in several Microsoft products, including the Internet Explorer, Microsoft Edge, as well as in Windows 8 and newer versions of Windows. It is supposed to help to protect your computer against unwanted software. It uses a reputation-based system to rate files downloaded from the internet. That means that a file gets a better reputation when it gets download more often. As a result you might get a warning like this, especially for GAMS distributions that were recently released:
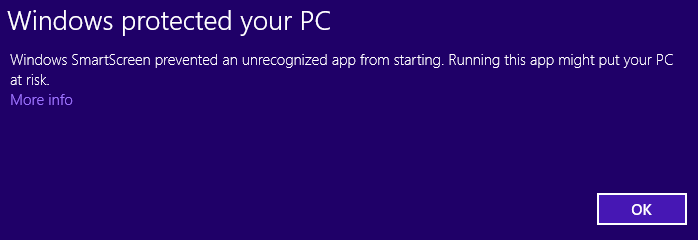
clicking on “More info” will display an option to continue the installation process.